4 Crow Pose Variations to Advance Your Yoga Practice
Crow Pose (Kakasana/Bakasana) is often the first arm balance we teach in a vinyasa class. While it looks like it requires a lot of arm strength, crow pose is mostly a balancing act that helps you get comfortable being upside down. If you’ve been practicing crow for a while and are ready to up-level your practice, try out our advanced crow pose variations to bring more challenge to a familiar pose.
In this post you’ll learn:
The goal of this guide is to help you move into crow pose and crow variations with trust and confidence in yourself! Let’s get started!
What’s the difference between Crow and Crane Pose?
You may have heard instructors refer to Crow and Crane pose interchangeably, but while they seem similar, they are actually different in practice! That’s why they have different names in Sanskrit. In crow your arms are bent, while in crane your arms are straight. Both poses require flexibility and balance, but crane pose requires a lot more upper body strength. It’s considered the more advanced of the two, so practice crow before you try on crane!
Note: Though we often refer to crow and crane as Bakasana, the sanskrit for Crow pose (with bent arms) is actually Kakasana.
Similarities between Kakasana and Bakasana:
Hands are planted with fingers spread wide
Gaze is forward and down
Knees are balanced on triceps
Feet hug towards glutes
Differences between Kakasana and Bakasana:
In Crow pose (Kakasana), your elbows are bent at a 90-degree angle
In Crane pose (Bakasana), your arms are straight or very slightly bent
Can anyone do Crow Pose?
While crow pose does take a combination of strength, balance, and flexibility, it’s accessible to most people. To check if you are physically capable of Kakasana, check your strength and flexibility with these steps:
1. Hip Flexibility: Touch your knee to your triceps
From halfway lift, come into a tuck squat/small ball on the ground with your heels lifted and your hips dropped towards your heels. Rest your fingertips on the ground in front of you. Start to shift your weight forward into your hands while slowly lifting your hips until your palms are fully grounded. Are your knees at your elbows or higher (towards armpits)? If so, you have the hip flexibility.
Option 2: Lay on your back and pull your knee in towards your chest. If you can touch your knee to your elbow, you have enough hip flexibility.
2. Wrist flexibility: Tabletop stretch
Start in table top with your palms flat on the earth directly beneath your shoulders. Lean forward about three inches. If you can keep your palms fully grounded, you have the wrist flexibility.
3. Core Strength: Hold Plank or Boat Pose
Option 1: From your hands or forearms hold a high plank for 30 seconds. Keep your hips in line with your shoulders and heels.
Option 2: Have a seat on the ground. Lean back to find boat pose (Navasana). Keep your chest up and your shins parallel to the earth. Hold for 30 seconds.
If you can complete these exercises, you have enough core strength for crow.
4. Shoulder Strength: Chaturanga Push-Ups
From your knees or toes, plant your palms directly under your shoulders. Hug your elbows into the sides of your body, and bend your elbows to 90 degrees. Then press the ground away to re-straighten your arms. If you can re-straighten your arms, you have the shoulder strength.
Why Can’t I Do Crow Pose?
These 8 common misalignments may be why you’re struggling to fly your crow.
1. Your hips aren’t flexible enough
If you struggle to get your knees to touch your triceps, you may be moving in without stretching out enough first. Try knee to chest pose (Eka Pada Apanasana), lizard pose (Utthan Pristhasana), and half happy baby pose to open your hips prior to trying on crow.
2. Your hands aren’t in the right place
Make sure your hands are directly underneath your shoulders, like in tabletop pose. If your middle finger is pointed forward, your elbows might want to splay out. Try externally rotating your hands slightly so that your pointer finger points forward. This helps keep your elbows hugged in.
3. You’re not gripping the mat
When people complain of wrist pain following arm balances, it’s usually because they’re not gripping the mat. To engage your hasta bandha (hasta meaning hand, bandha meaning lock) start by spreading your fingers comfortably wide on the mat. Lightly grip the earth with your fingertips while pressing all of your knuckles into the floor. The center of your palm should slightly lift up, while your thumb and forefinger carry the most weight.
4. Your elbows are splaying outward
It’s a misconception that splayed elbows can make crow pose easier, but having everything hugged into the center of your body actually makes balancing easier. Activate the muscles in your chest and pull your elbows in towards one another to stay strong in your upper body.
5. Your core isn’t activated
You should always warm up with a few core exercises before moving into any arm balances. As you shift your weight into your hands, hug your belly up and in to engage your transverse abdominals.
6. You’re relying on balance
Your knees are not meant to be heavy on your triceps. Think: lift! As you activate your core, the balance of your knees on your arms should get a bit lighter, allowing you to float your toes.
7. You’re not looking forward enough
Your gaze should be at least a foot forward past your fingertips - if not more! Remember: Your body will move in the direction of your gaze. Crow pose requires you to lean forward a lot. Let your gaze go forward, too.
8. You’re afraid of falling
The #1 reason why people struggle with Crow Pose is fear. It’s what keeps you from leaning forward enough or shifting your weight primarily into your hands. Remember: the ground is very close! If you fall out, you’re only a few inches away from the ground, and your knees will probably be the first to land. Sometimes falling out of the pose on purpose can help you get into the mindset that falling is nothing to be scared of! It’s part of the process.
How Long Does it Take to Master Crow Pose?
It’s different for everyone! Some people will be able to move into an arm balance the first time trying it on; others need years of practice. If you’re brand new to arm balances and are regularly working on building strength and flexibility for Kakasana, you can expect to find flight in about 3-12 months.
What are the Benefits of Crow Pose?
It’s a safe arm balance for beginners
Kakasana is a popular arm balance for beginners because it’s close to the ground. You can fall safely without hurting yourself, and the poses that help you prepare are beginner-friendly.
It has all the benefits of an inversion
Any pose where your head is below your heart is an inversion! Even if you’re toes stay on the ground, you’ll still get the physical benefits of the pose. Inversions increase blood circulation to your brain and stimulate your lymphatic system.
It strengthens your stabilizer muscles
While it’s important to strengthen the major muscle groups in your body, practicing crow pose can also improve small stabilizer muscles in the hands and forearms. You might feel sore in your forearms when you start practicing arm balances, and that’s okay!
It teaches you to trust yourself
Stepping into a challenging pose or arm balance requires mental strength and flexibility. The process involved getting out of your own way, releasing fear, and trusting your body!
5 Best Drills to Prepare for Kakasana

1. Wrist Stretches
Come into table top with your wrists directly under your shoulders. Rotate your fingers to point back towards your knees, palm-face down. Rock gently forward and back. Allow the stretch to be gentle by engaging your core and keeping weight in your knees.
Perform 10-15 reps
Additional options: Flow through cow and cat with your fingertips facing back, or ball your fingers into a fist and roll out your wrists.
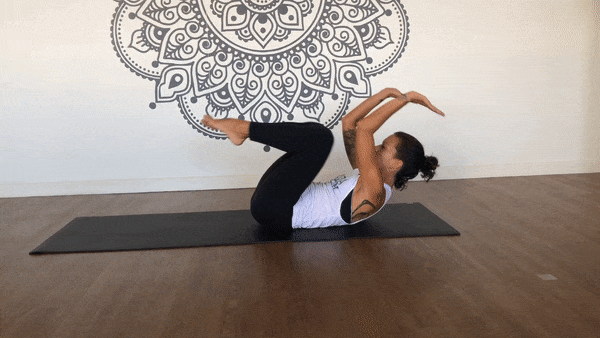
2. Crow Crunches
Lay on your back in reverse table top, with your shins parallel to the earth. Lift your head and chest to press your elbows into your knees. Slowly extend your arms and legs, then crunch in.
Perform 15-20 reps

3. Alternating Crow Crunches
Lay on your back in reverse table top, then lift your chest and press your elbows into your knees. Drive your lower back down into the mat to engage your core even more. Extent one leg at a time, alternating right to left.
Perform 10-15 reps on each side.
4. Slow Mountain Climbers
Find plank pose. Align your hips with your shoulders and heels. Draw your right knee to your right elbow, step back, draw your left knee to your left elbow, and step back. Perform 10-15 reps on each side.

5. Hamstring Curls
Make your way into modified airplane, balancing on one leg with your fingertips gently on the ground. Bend your lifted leg to 90 degrees, and then lengthen out. Squeeze your heel towards your glute as you bend to activate your hamstring.
Perform 15-20 reps on each side
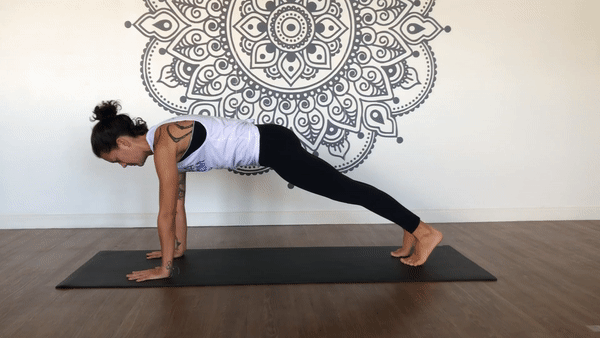
6. Chaturanga Push-Ups
From plank pose, shift forward onto your toes. Bend your elbows to 90 degrees, hugging your elbows into the sides of your body. Then press the ground away, straightening your arms and returning to neutral. You can also practice these push-ups from your knees. If you do so, keep your hips in line with your knees and shoulders.
Perform 8-15 reps
How to Do Crow Pose (Kakasana)

From halfway lift (Ardha Uttanasana), bend your knees a lot and place your hands on the ground. Find your hand lock (hasta bandha); grip the earth with all ten fingers and drive your knuckles into the mat.
Rest your knees on your triceps, anywhere from your elbow to your armpit. Try to get them as high up as you can. The closer your knees are to your shoulders, the easier it will be to find balance!
Hug your elbows in towards your midline. Avoid bowing your elbows out to the sides.
Gaze forward at least 1-2 feet. If you gaze back or between your hands, it will make you want to somersault.
How to Use Props to Modify Crow Pose
If you’re just starting to learn arm balances like Kakasana, using blocks is a great way to get yourself comfortable with the balance point of leaning your weight into your hands. You can use blocks in the following ways to help you get into the pose:
Block Under Forehead
Place a block on the ground in front of you at its middle or highest setting. When you shift forward, allow your forehead to rest on the block. This allows you to play around with lifting your toes while feeling stable in your upper body.
Block Under Toes
Start by standing on a block. When you place your hands on the earth, your toes will already be a few inches higher than the ground. This can help you get your knees higher on your triceps or make it easier to lift your toes.
Common Crow Misalignments & How to Fix Them
1. Your knees are on the outsides of your arms
Having your inner knees balanced on your elbows may feel easier for some, but it’s actually a different pose altogether. That pose is called Flying Frog.
2. The bend in your elbows is too small
Giving yourself enough bend in your elbows helps you find your balance point. As we mentioned earlier, Crow with straight arms is actually Crane pose, and it’s much more difficult to master. Give yourself a deep bend in your elbows to make the pose more accessible.
3. Your hands aren’t gripping the mat
Press down into all of your knuckles and spread your fingers wide to make sure you have a solid base. With your weight equal between all digits, shift further forward to take weight out of your wrists.
Crow Variations: Advanced Arm Balances
Now that we’ve taken time to dissect basic Crow Pose, we’ll add on with a deep-dive into four advanced arm balances you can try on once you’re feeling confident in Kakasana. The warm-ups you perform to prepare for Kakasana also get you ready to move into:
Crow Jumpbacks
One-legged Crow
Crow to Headstand
Headstand to Crow

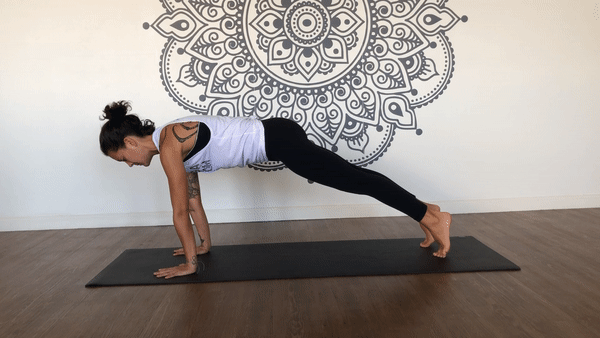
Variation 1: Crow Jumpbacks
You may have heard your instructor give the option to hop back from crow into high-to-low plank (Chaturanga Dandasana). We call that transition a crow jumpback, because you shoot your feet back and land in a low plank. It’s an advanced transition, but it looks more difficult than it is. The hardest hurdle to overcome is a lack of trust!
A common misconception in this crow variation is that the power comes from kicking back. This transition actually moves in two directions: while you kick your feet back, you also pull your heart forward. If you only think about your lower body (feet back), your chest will fall to the ground.
How To Do Crow Jumpbacks:
Start in crow pose.
Activate your core to prepare for the movement.
Hug your inner thighs together to stay light in your knees.
Commit to the movement! At the same time you kick your feet back, pull your heart forward to land in a low plank with your elbows bent. It’s important to bend your elbows - landing with straight arms puts a lot of pressure on your joints.
It can sometimes help to imagine someone has a hold of your feet and they’re going to pull them back. While this can seem like an intimidating move, the worst thing that can happen is that you land on your belly. And if that’s where you are, that’s okay!

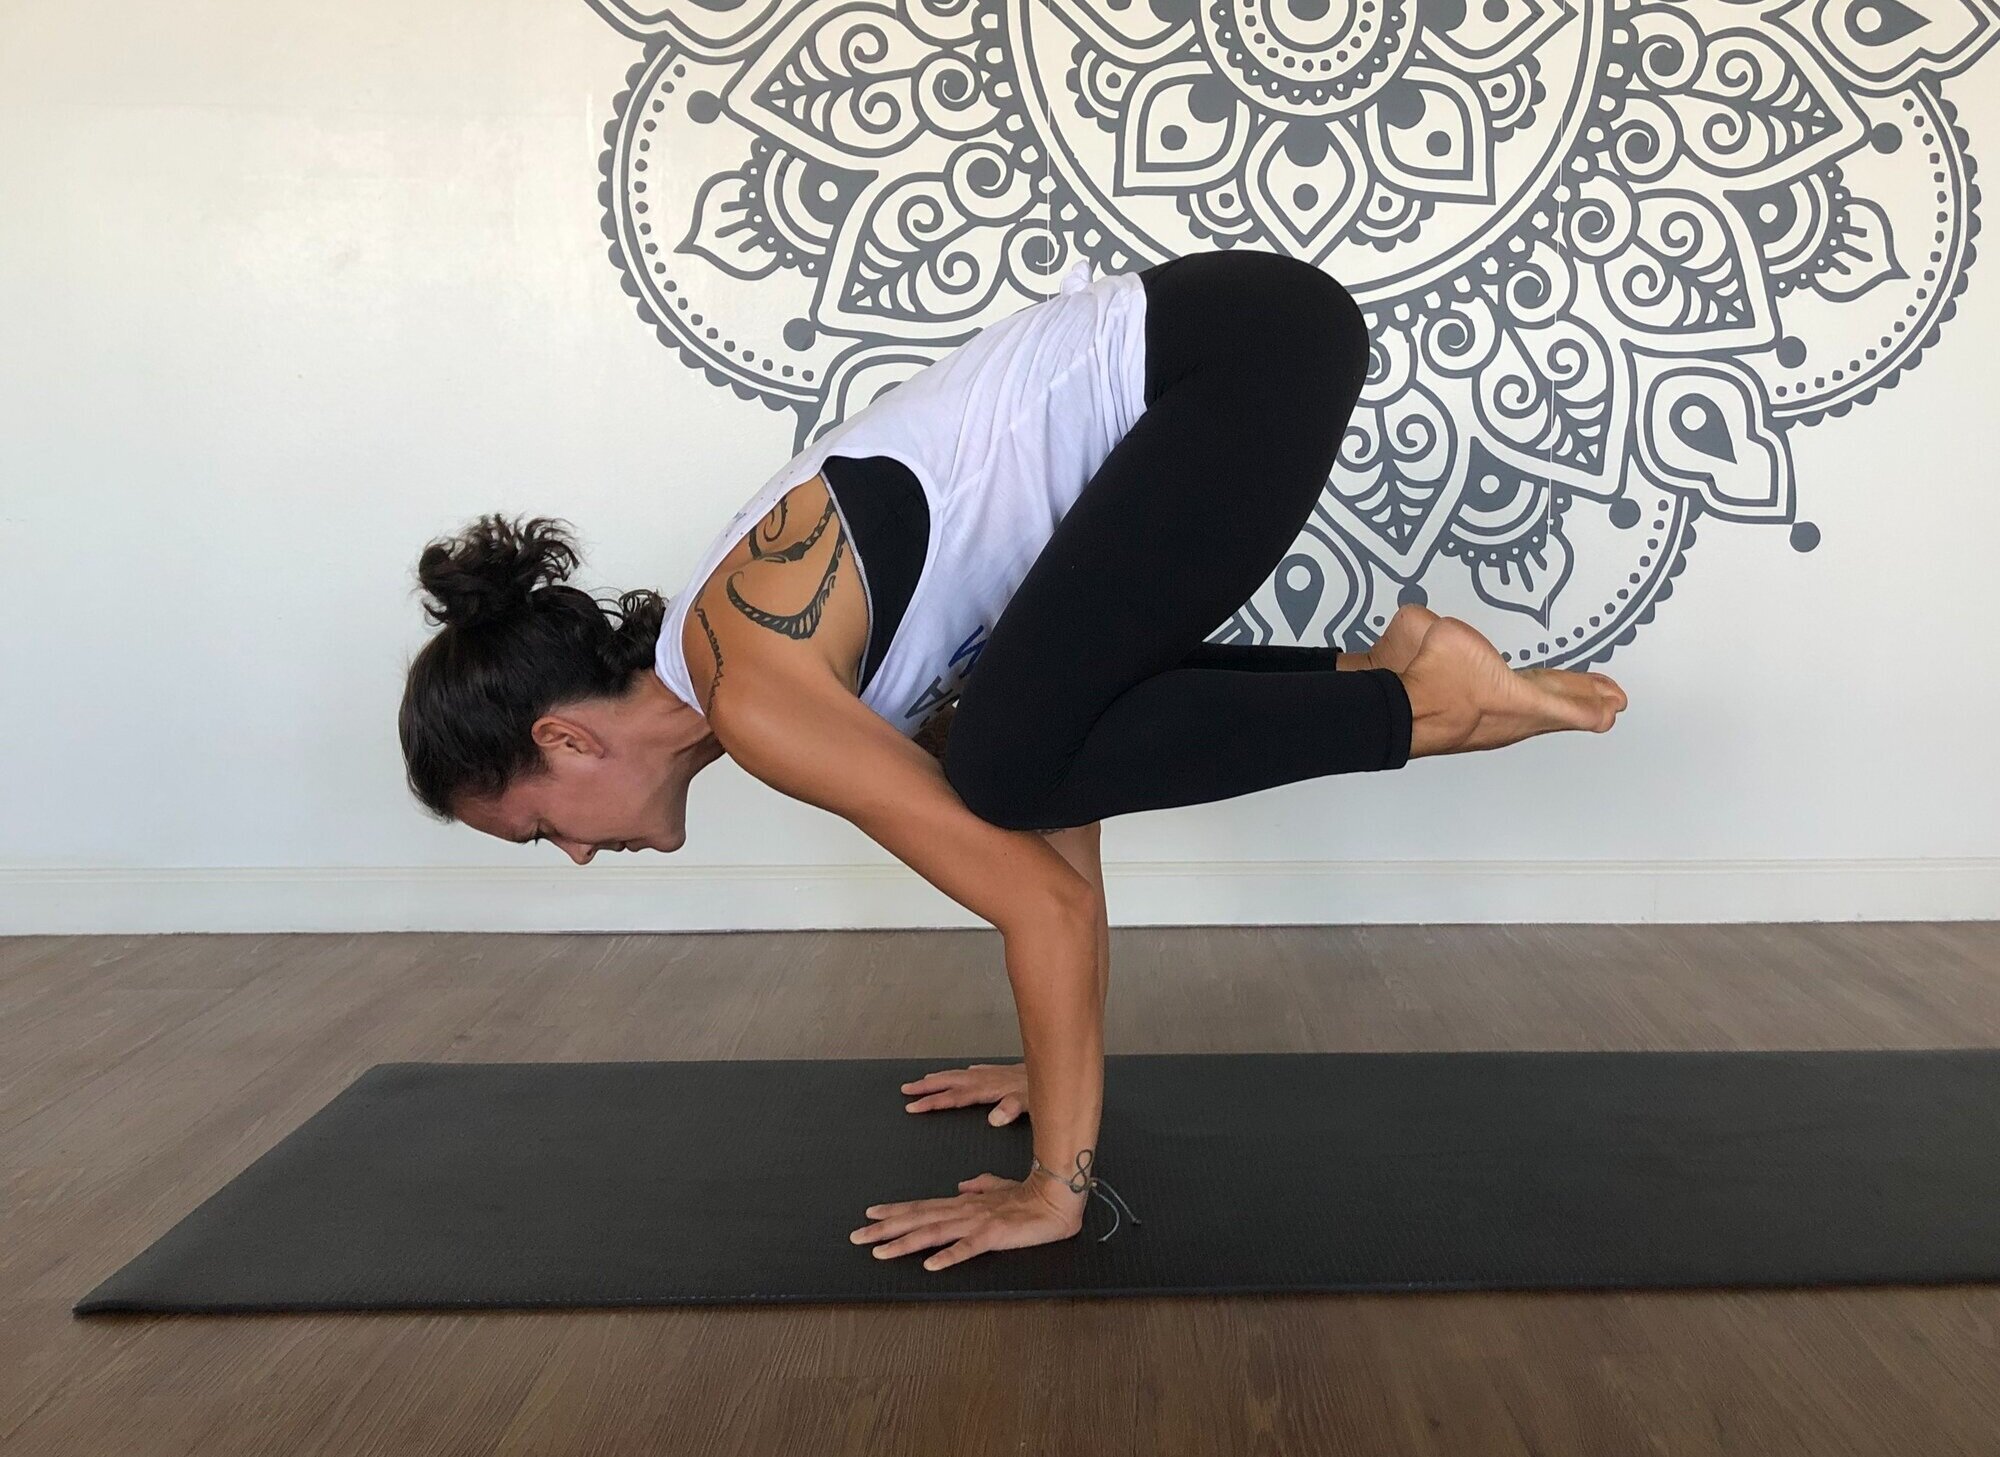
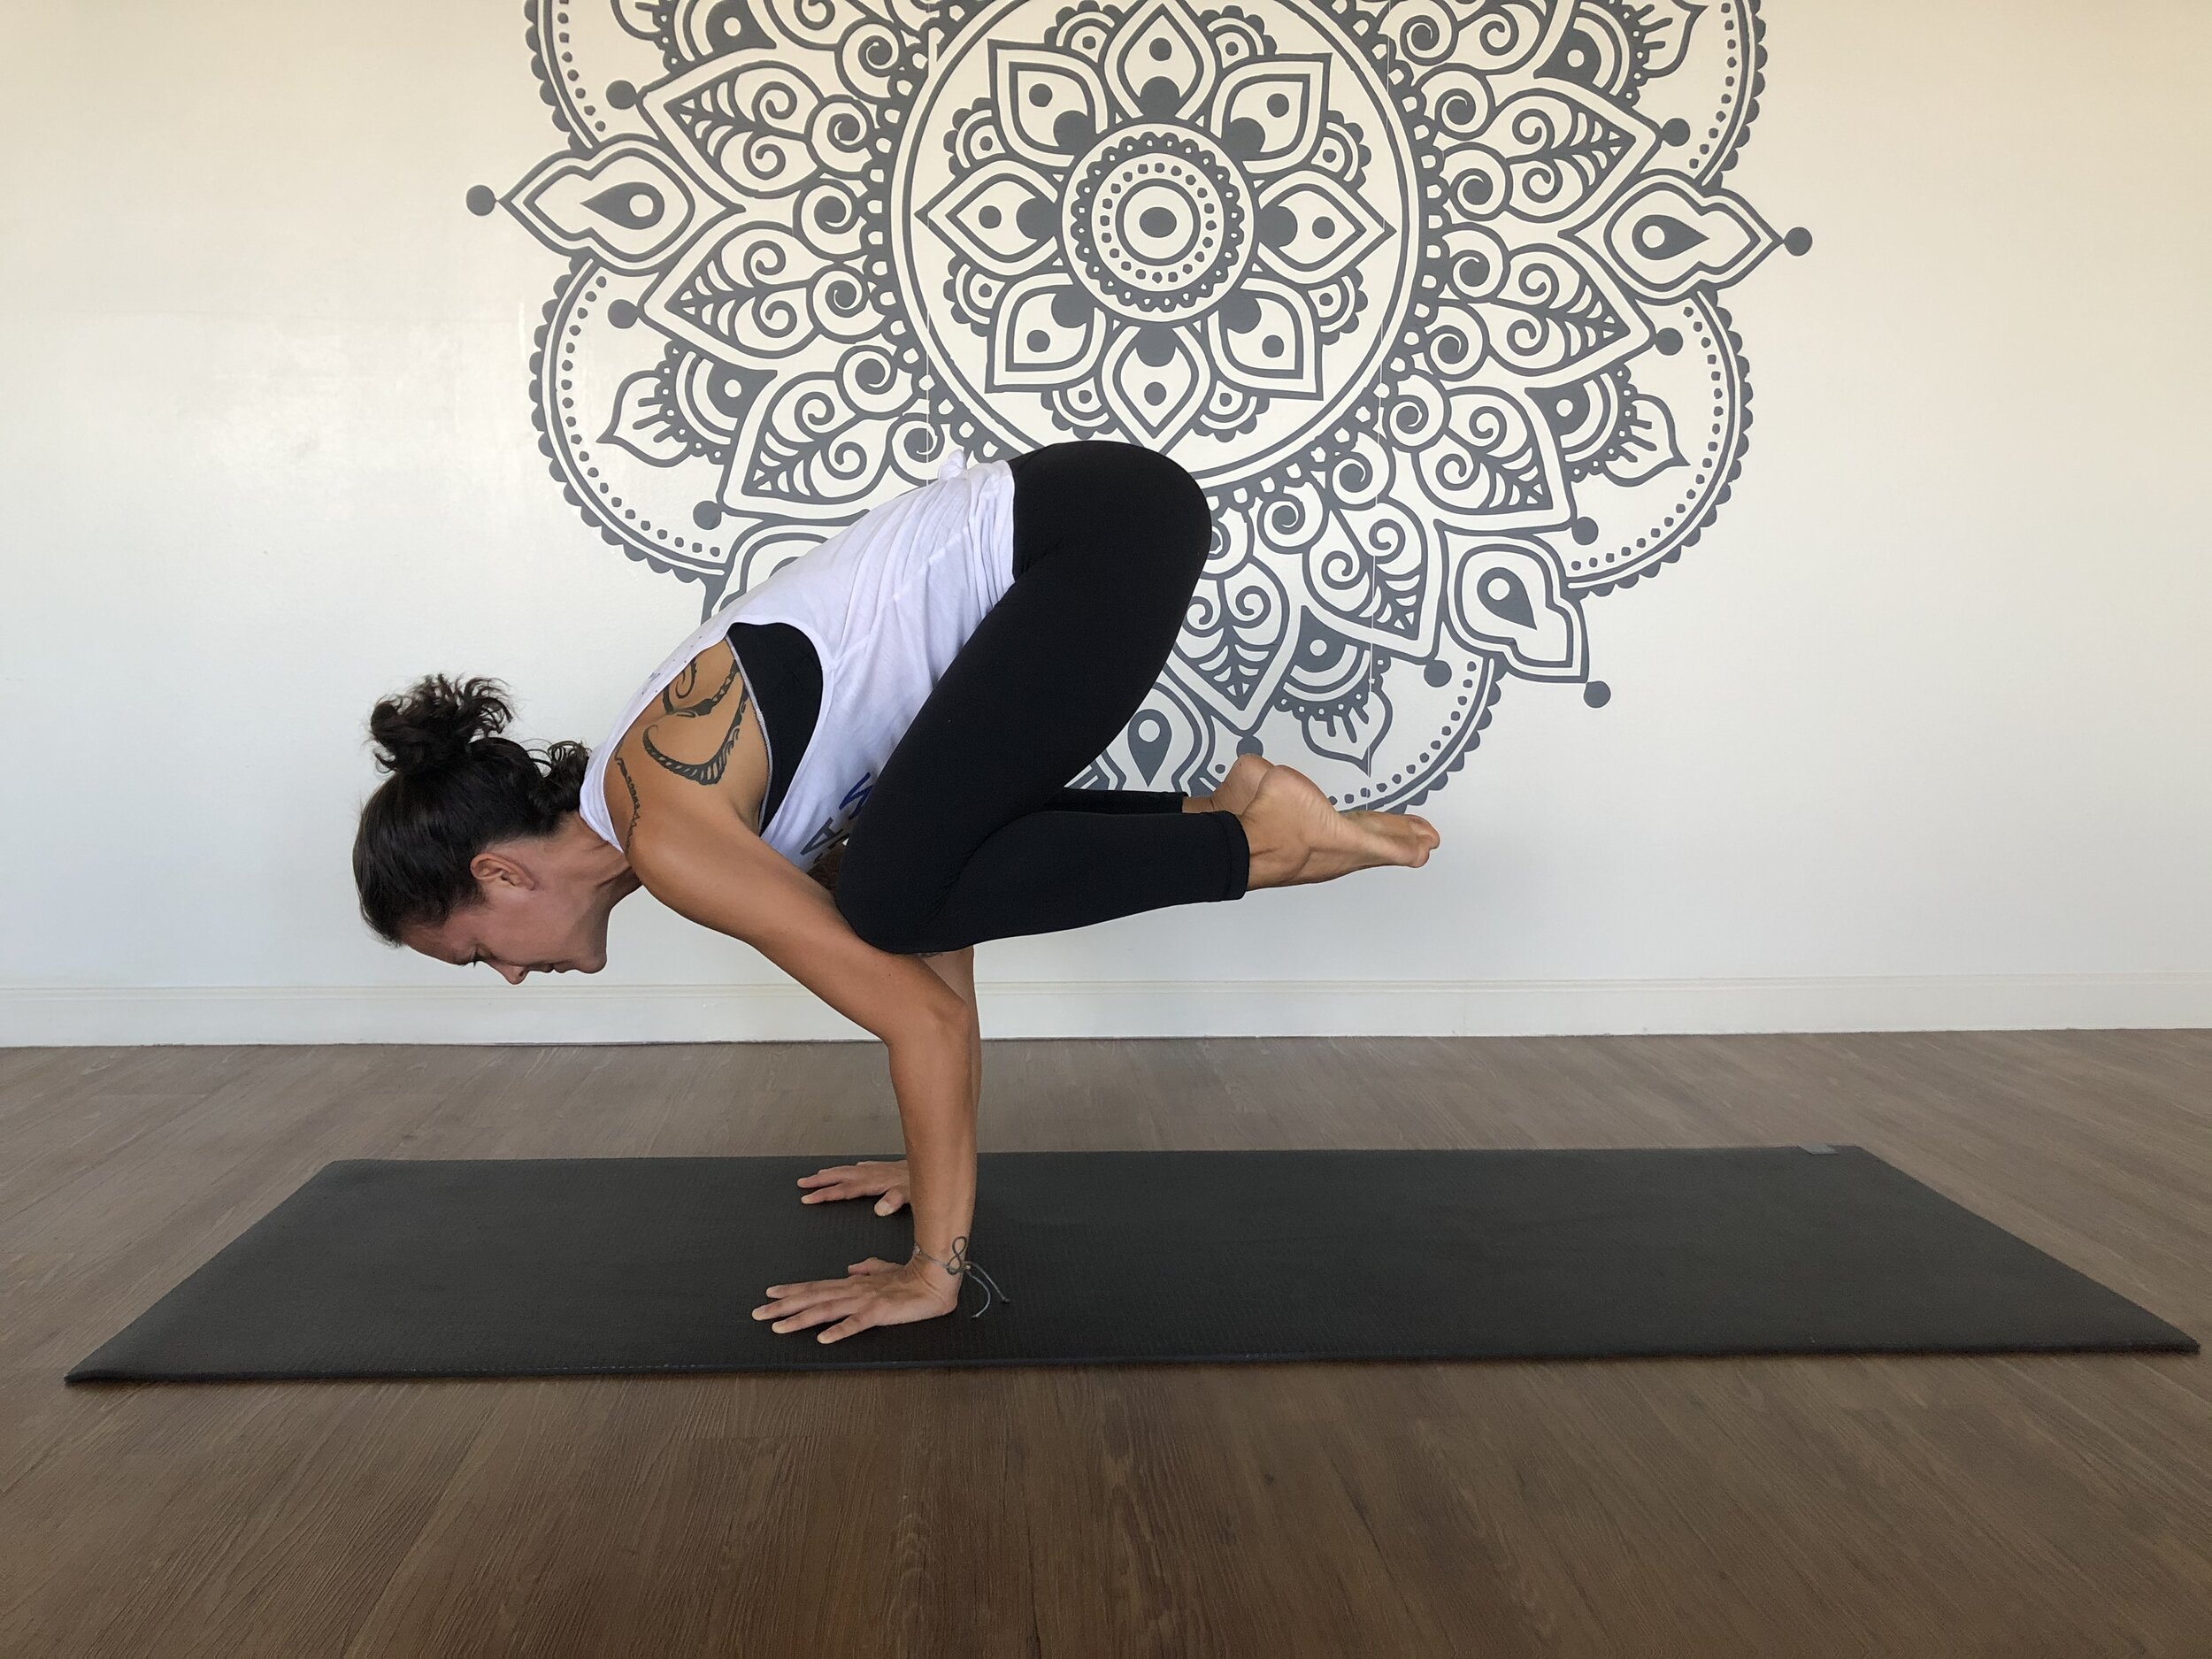
Variation 2: One-Legged Crow
One legged crow is similar to traditional crow pose, but instead of having both knees on your triceps, you extend one leg long behind you. This requires more strength in your chest, core, and legs. It’s also a balance challenge, since your weight is less evenly distributed.
How To Do One-Legged Crow:
Start in crow pose, with your knees as high on your triceps as possible to lift your tailbone high into the air.
Squeeze your knees in towards each other to engage your midline
Engage your core by drawing your bottom ribs in
Start to hover one knee by squeezing your glute and hamstring
Hug your elbows in towards one another
Drive your lifting foot back, keeping the activation in your glute and hamstring
Modification
Keep your toes on the ground for more stability. One foot will stay on the ground while you extend the other leg up and back. Focus on engaging everything into your midline - your elbows, inner thighs, and core. As you progress, you can keep your grounded toes on a block to feel a lift.
Like in crow pose, you can use a block under your forehead to give you confidence in your balance. Rest your forehead on the block while you extend one leg, but keep the weight in your hands rather than your head.
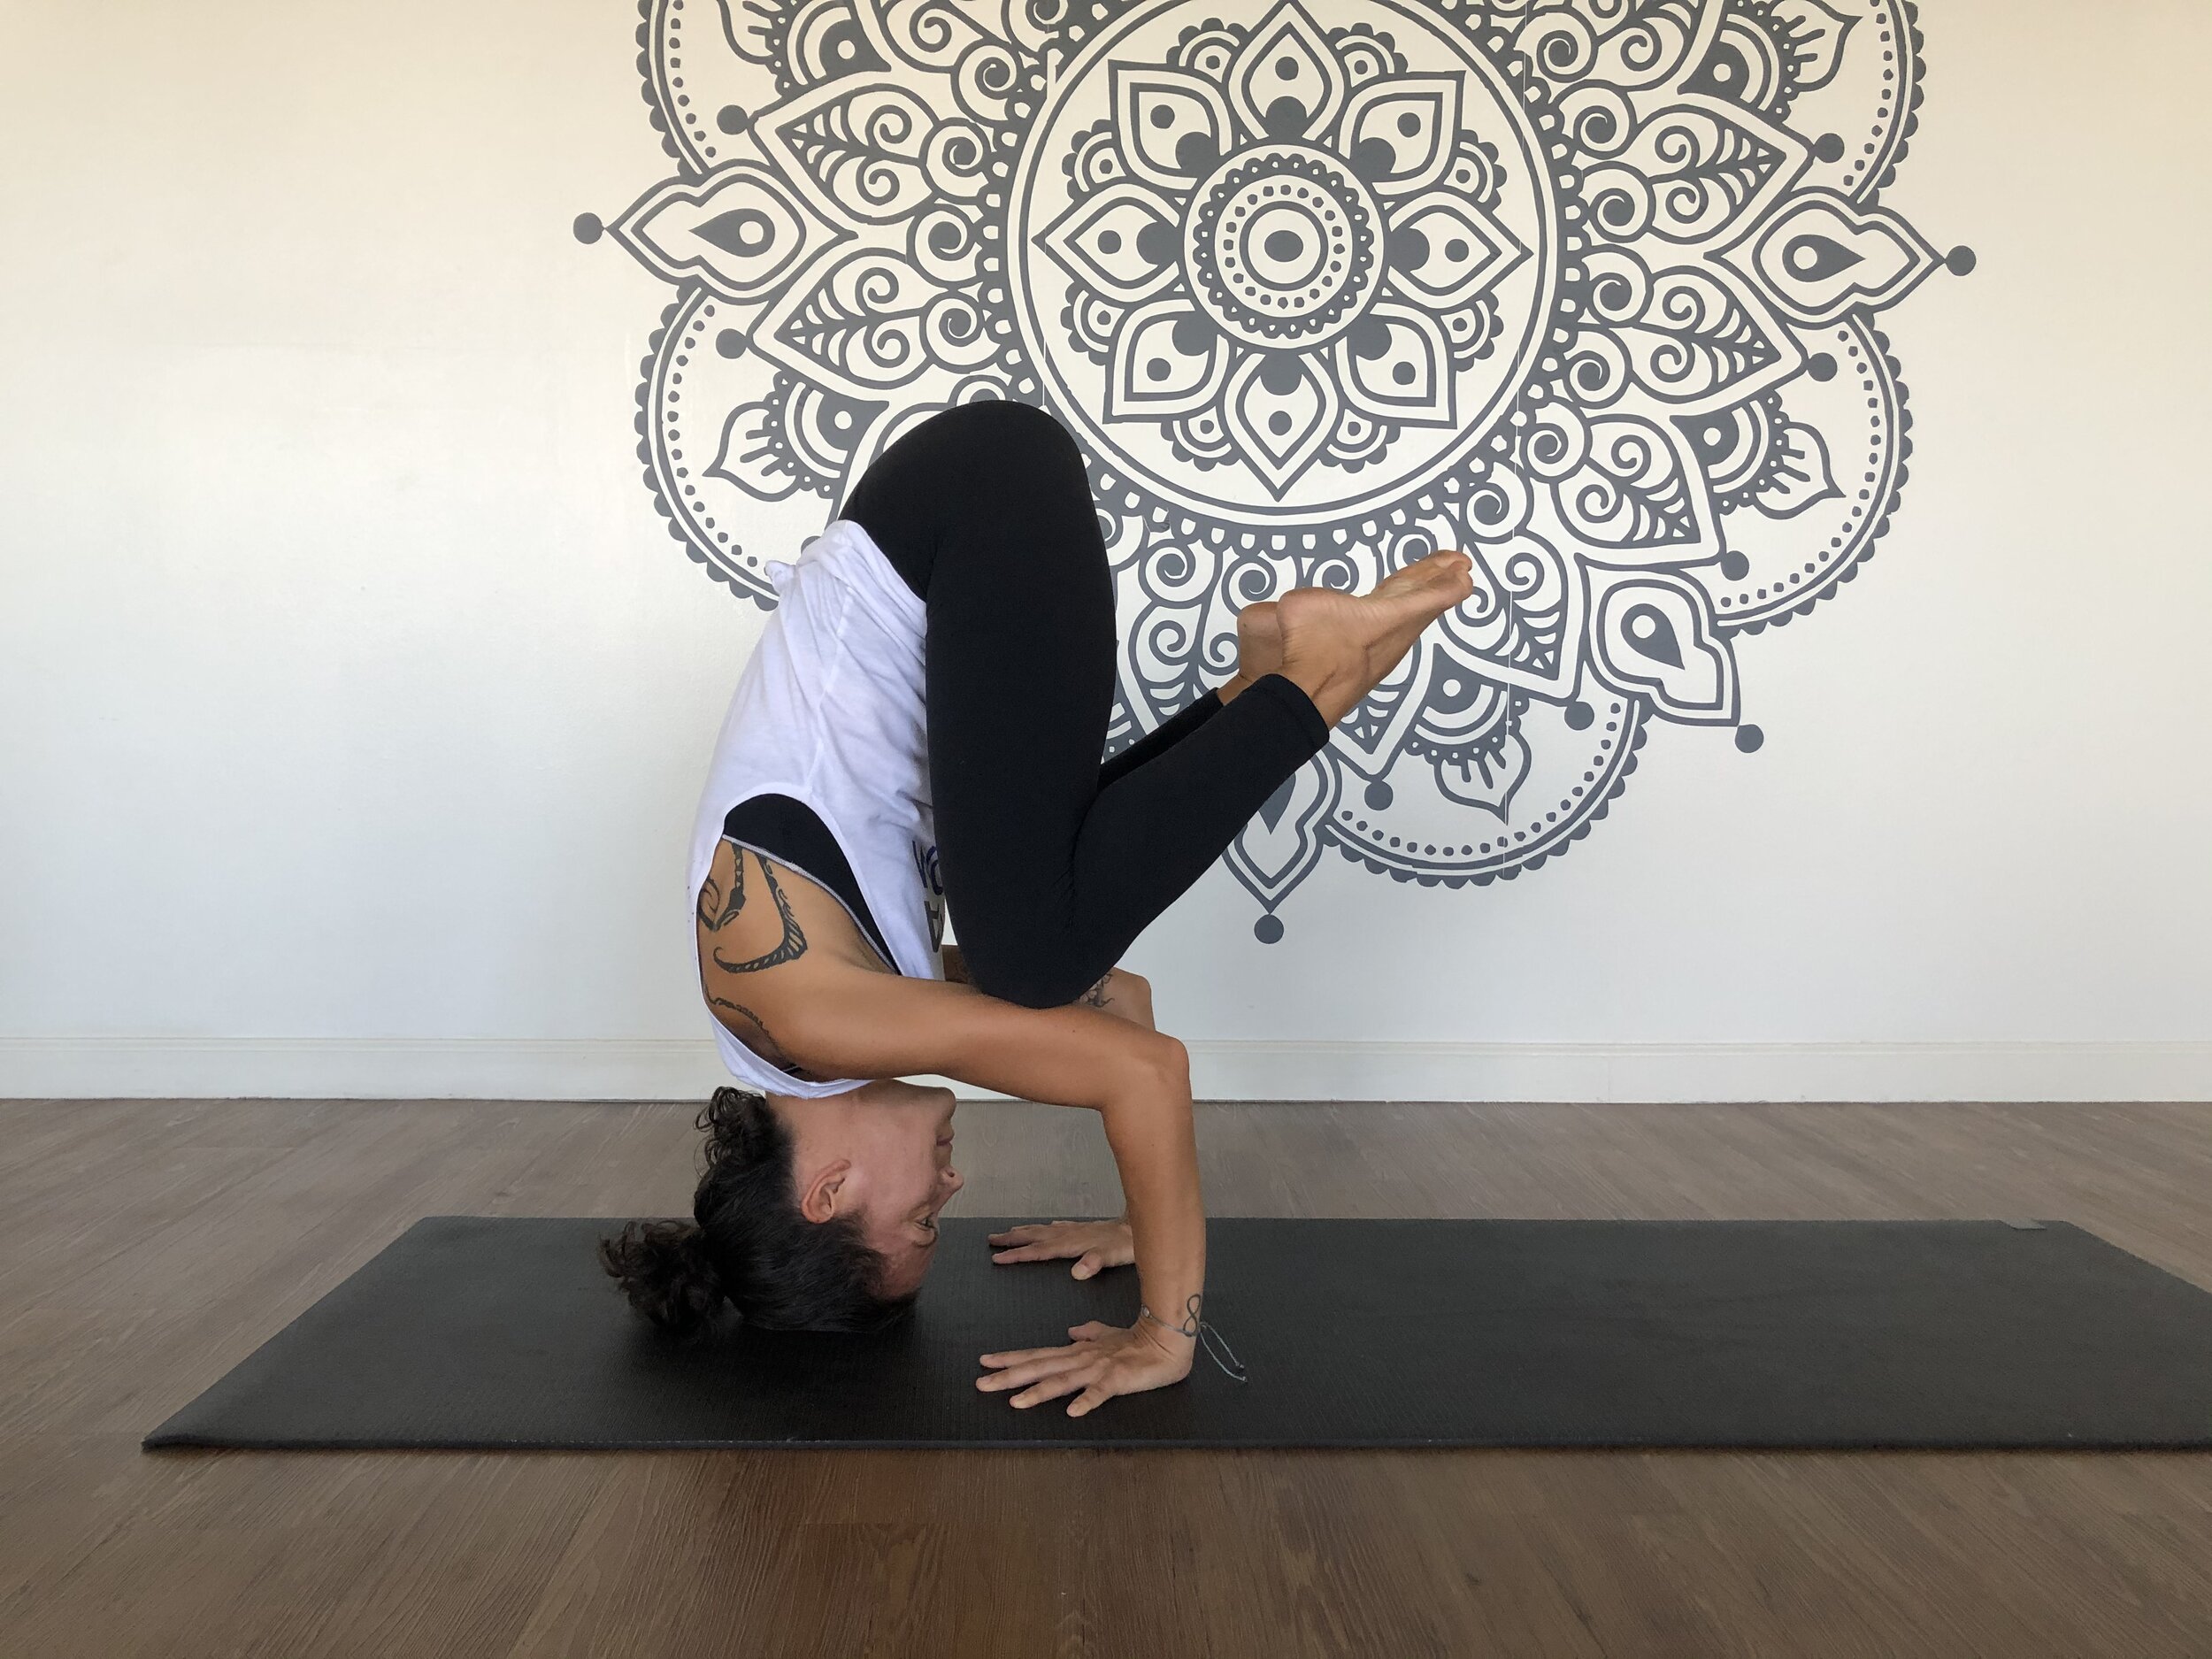
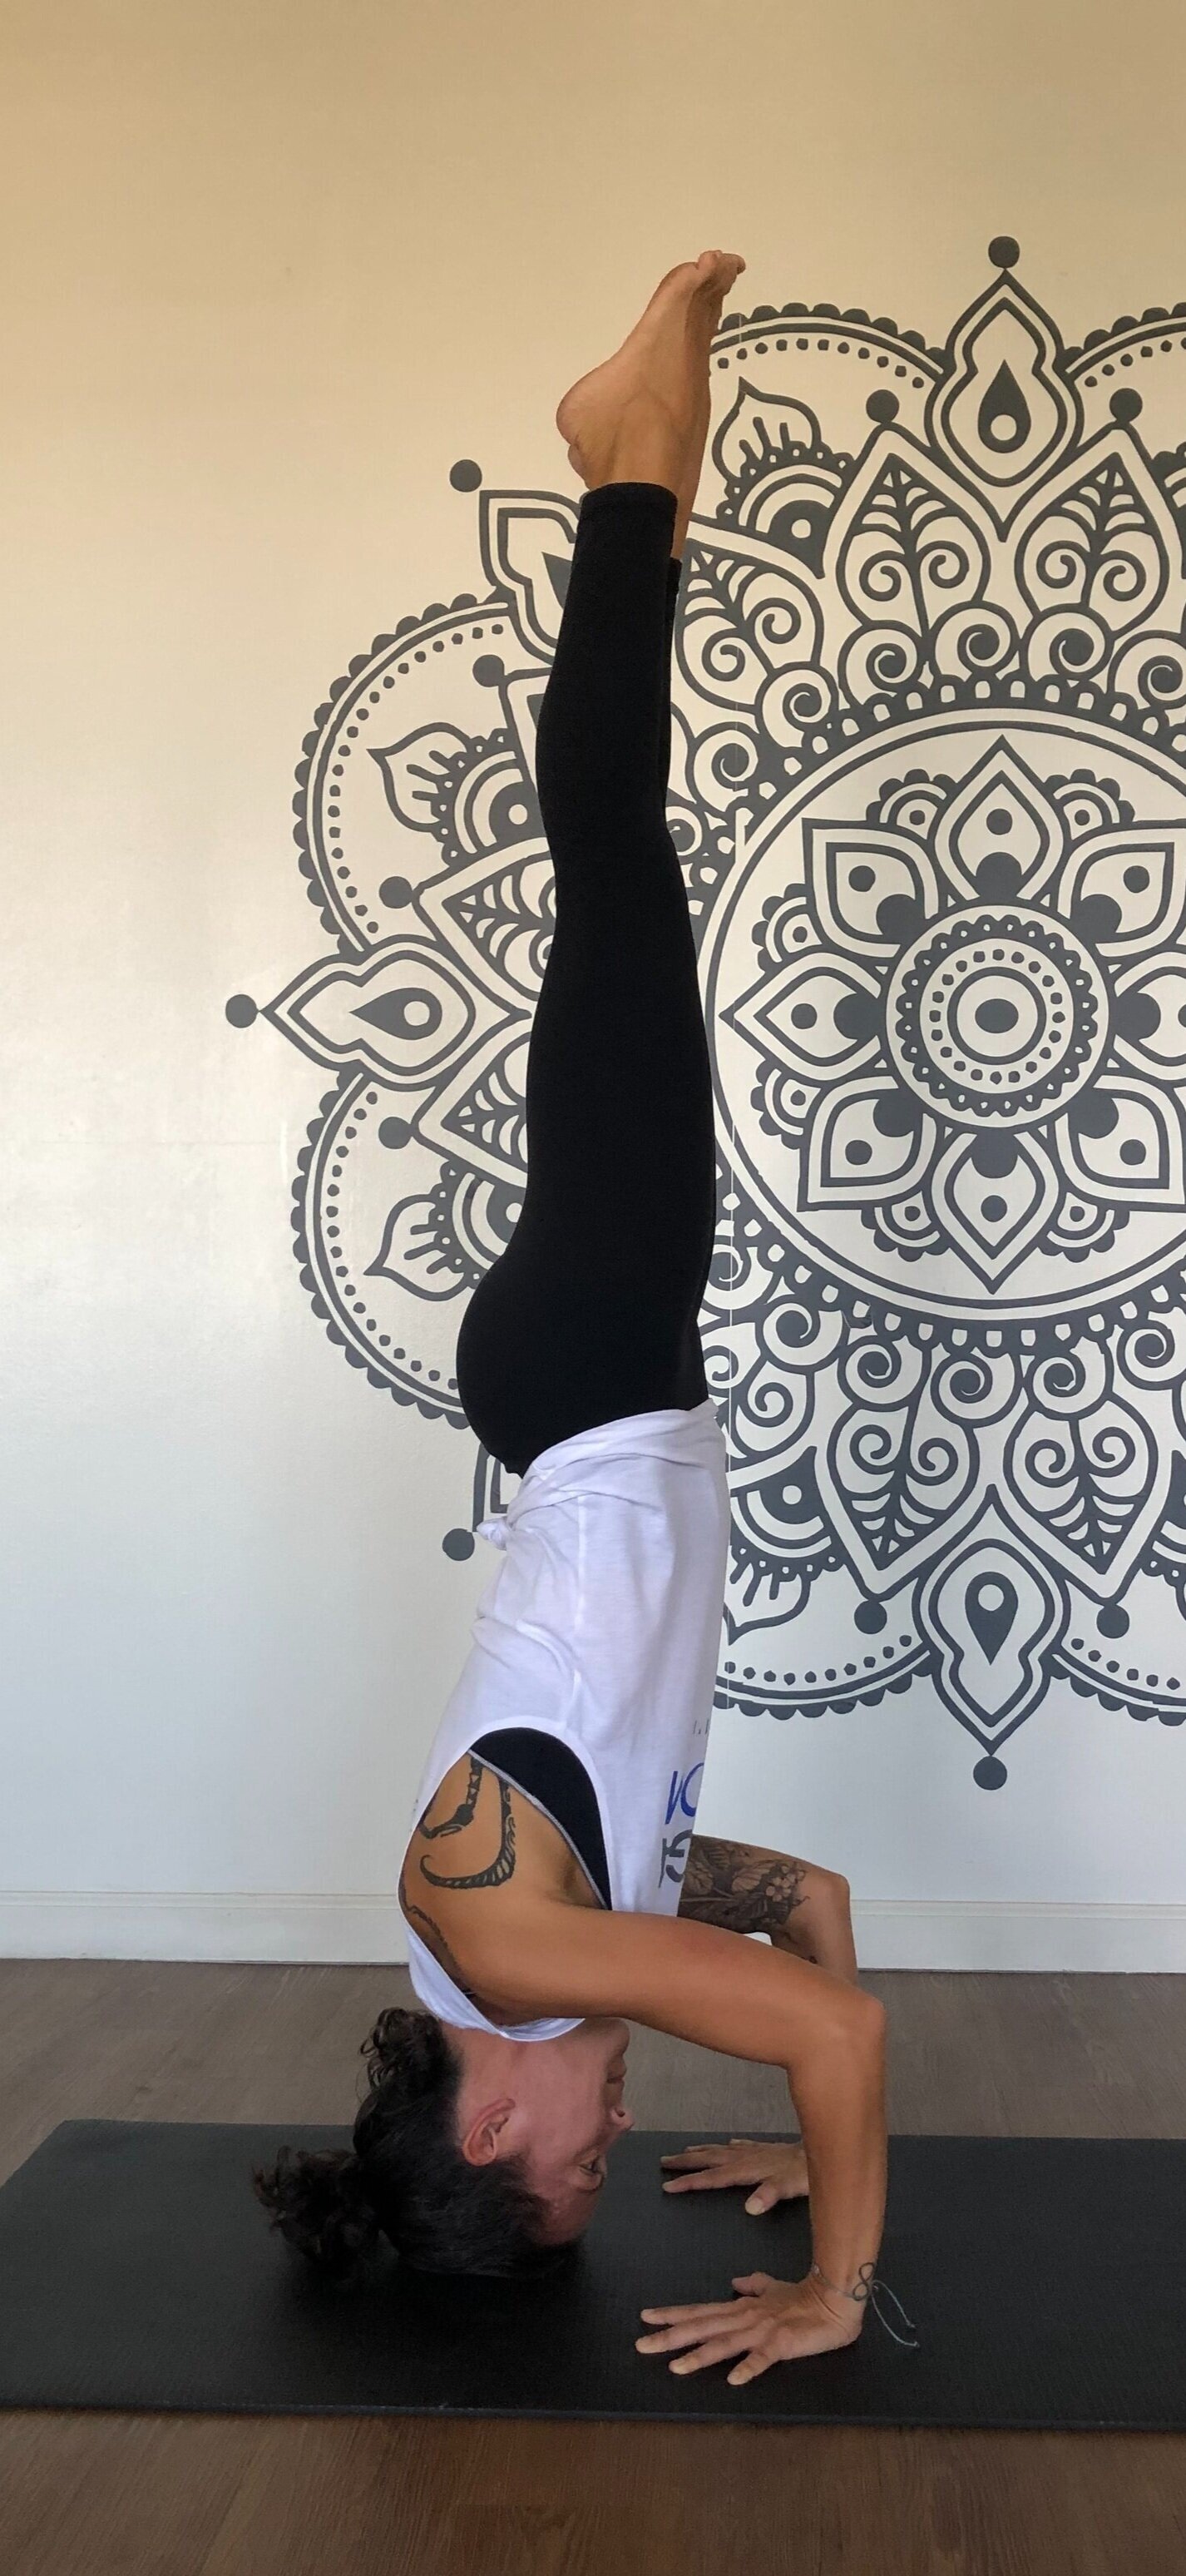
Variation 3: Crow to Headstand & Headstand to Crow
If you can do crow and tripod headstand separately from one another, you have the strength to link them together. It takes a little practice and a lot of trust in yourself. The mental barrier is the biggest hurdle here, so if it helps you to practice near a wall or with a spotter, start there!

How To Do Crow To Headstand:
From crow pose, start to gaze back towards your toes.
Slowly let your head touch the ground, using the strength of your arms and core to maintain control. Tuck your chin in slightly so that you’re resting on the flat crown of your head rather than your forehead.
Squeeze your inner thighs to feel your knees get light on your triceps.
Activate your core and start to lift your toes up.

How To Do Headstand To Crow:
From your tripod headstand, slowly lower your knees into your chest, and then connect each knee to a tricep
From the crown of your head, roll yourself slightly back, so that your head is connected to the floor at your hairline.
Hug your elbows in and use the strength of your shoulders to press the earth away
Keep your gaze forward to stay balanced in your crow